This technique has been improved upon HERE
So I saw swatches of "Stay the Night" and loved the look but not the price tag attached. Sorry but when it comes to nail polish I'm not big on spending more than a few bucks on a bottle for a polish that I'll never use all of it.
A while back I was measuring out some Chia seeds and that got me thinking about what I was calling "Liquid Lava".
Those that know me know just how determined I can be when I want something and they also know I'm creative.
Chia seeds weren't going to cut it and not even a consideration but they did set me to thinking (occasionally a dangerous thing!!). Fast forward a bit and I was going thru yet another box of crafting supplies when I pulled out something that I don't even remember why I have it...black sand.
Check out my DIY after the jump.
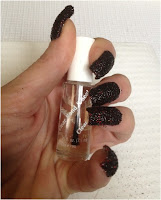
Without further delay lets get started on my DIY for OPI's "Stay the Night" Liquid Sand.
Supply List

- Black crafting sand
- Black micro glitter
- Red micro glitter
- The Best Glue Ever
- Base coat
- Thick clear coat
- Matte top coat
Step one is to make the sand/glitter mix.
I used an old prescription bottle to mix the sand, black glitter and red glitter. I didn't measure but the majority of the mix is the black sand with a splash of black glitter added in. When adding the red glitter add a small amount and mix then see if you like the look. I added a splash of red and it was to overwhelming so I added more sand.
Step two is to prepare the canvas.
For this tutorial I only used a base coat on my nails. I did it this way so that you can better see how the mix adheres to and covers the nail. I'll have some commentary on this choice later.
Step Three
Apply a coat of "The Best Glue Ever" and allow to dry.
*I originally tried with foil glue and it sucked and only held the glitter in place. For easy application of the glue I put some into an old cleaned out nail polish bottle and added about 1 part water to 3 parts glue. This glue is very thick even with the water added. To make it even easier to apply without watering it down further I let the bottle sit in a cup of hot water. When warmed it goes on nicely. From the photo you can see that it dries from a purplish color to clear.
Step Four
One at a time dip your nail into the mix. I dipped and pushed into the mix a couple of times just to make sure every spot was covered. Shake off as much as you can from each nail before completely removing your finger from the bottle.
Firmly tamp over the entire nail to make sure that the mix is well adhered.
Step Five
Brush off any loose mix. I brushed over, across, up, down and around the entire nail to remove any loose mix. I did this over the trash can to minimize any mess. As you can see from the photo, the mix stayed on the nail very well.
At this point, if I had put on a coat of black polish I may not have needed to do another layer of the mix.
Step Six
Apply a second coat of the glue. Don't apply all the way to the cuticle area but start about 1 mm away due to the thickness of the texture.
The next time I do this type of mani I think I'll thin the glue down a bit more as this layer has a lot of little nooks and crannies to fill and the glue takes much longer to thoroughly dry. Just a little FYI there.
Step Seven
Once the glue is dry follow the procedures from steps 4 and 5.
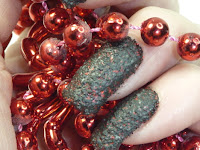
Just look at how nicely this cleans up after brushing. By using the dip and press method in a bottle the mess and clean up is minimal.
I haven't done any clean up other than brushing.
Step Eight
To set the mix I applied a thick clear coat. I used an old bottle of "Clear & Bond Seal" that came with a nail art kit from years ago.
I think any top coat would work for this step but I wanted to make sure that all the mix was set and all the nooks and crannies filled. For one I wanted to make sure that water couldn't get into the layers and secondly I didn't want any of the mix to contaminate my matte top coat.
Step Nine
Apply the matte top coat of your choice.
Tip: Make sure the sealing coat is completely dry before putting the matte top coat on otherwise the matte coat isn't as effective and will leave some shine.
This was my first stab at a textured mani. Keep watching for my take on concrete nails and leather nails. If you try my DIY for liquid sand let me know how it worked for you.


No comments:
Post a Comment